Saturday, December 15, 2012

I Love Aprons & Almond Sesame Bread Recipe

Hi Everyone, here is a peek into one of my favorite kitchen accessories- Aprons.  I love aprons- New ones, Vintage ones, Ruffly ones, Simple ones and all the ones my Brother and Sister-in-Law give me and my Mom makes for me.  There is a Senior Center in the building that I work in and I recently found these wonderful Vintage aprons for sale that I couldn't resist adding to my collection.  couldn't pass up the blue polka dots apron and the red one with white ruffles.  


The person who helped me with my purchase said she was afraid no-one would buy them because it is a lost kitchen art form.  I helped her see that aprons can still make someone’s day and are an important part of the cooking process.  I have to be careful each day to take off my apron before I see clients.  I’m sure one day I’ll walk out of the house with one of my fun ones on. 


I thought this would be a perfect time to blog on this since I am also learning how to draw ladies.  I am stepping out of my box this year and trying new art techniques. I couldn't resist doing some ladies walking down the catwalk modeling these fun aprons. 


Today as I woke up to 18°F on a cold winter day, I decided someone needs to make fleece lined aprons for the long winters.  That would make me a very happy cook.

This is one of my favorite gluten free & fructose friendly breads for the "When Artists Cook Series".  It has great flavor, and if you slice and freeze it right away, it doesn't get too crumbly.  It makes a smaller loaf, so you’ll need to help yourself to more pieces.  I love eating it with garlic salt and creamy goat cheese with scrambled eggs for breakfast.  My favorite sandwich is bacon, butter lettuce and mayo on this tasty bread.  It is very simple to make.

Gluten Free Almond Sesame Bread


Ingredients
1 ½ cup blanched almond (I love Bob’s Red Mill or California Almond flour)
¾ cup tapioca starch
1/8 cup sesame seeds
½ tsp. sea salt
½ tsp. baking soda
4 eggs
1 Tbsp. olive oil
1 tsp. glucose syrup
1 tsp. white vinegar

Directions
*     Combine almond flour, tapioca, sesame seeds, salt and baking soda. 
*     In another bowl, blend eggs for several minutes, until frothy.  Stir in olive oil, glucose syrup and vinegar into the eggs. 
*     Mix the dry ingredients into the wet ingredients.
*     Pour batter into a well-greased 7 ½” x 3 ½” loaf pan. Add a piece of parchment to the bottom of the pan so it comes out smoothly.
*     Bake 350° for 30-35 minutes, until a toothpick inserted into the center of the loaf comes out clean.
*     Let cool.
*     Slice and freeze within a day to keep it nice and friendly.


Enjoy!

Sunday, December 2, 2012

Autumn Faery


Hi Everyone, Happy Holidays!


My hand decided to have a major arthritis flare, so I had to take a few weeks off from painting, drawing, etc. I didn't realize how hard it would be to go without creating art for so long.  I was hoping I would have had this done to wish you all a Happy Thanksgiving, but I just finished it this weekend.  Instead I wish everyone a really nice week!


The faeries had fun preparing the gardens for winter, but I believe they are all tucked inside now to stay warm and to play in the houseplants. 


In the art class I am taking, Joynal, we are learning to use Serviettes for backgrounds.  I feel pretty cool getting used to the word “serviette”, since here in Minnesota we have napkins.  But thanks to my teacher in Australia, I get a new flair of words while learning to paint ladies, fashionistas, faeries, and more.  


The background is a serviette that we had for our Thanksgiving dinner and a bit of acrylic paint to blend it all together.  It makes a great background for my garden faery.  

Wednesday, September 19, 2012

Queen of Nuts

"Queen of Nuts" (c) 2012 Colleayn T. Klaibourne
Watercolor and ink

Hi Everyone,

The new post is up for the  "When Artists Cook"  series for my recipe of Cashew Chicken. For more photos and to see the post, please click here.

Doodle before it was painted


The leaves are starting to turn into beautiful reds, golds, & rusts and fall is right around the corner.  This is the time of year for harvest and is also time for our squirrel's to go crazy for nuts!  I couldn't help but laugh as a little squirrel went running by with two large green walnuts hanging out each side of his cheek.  Up the tree, down the tree, race around the yard - that is what makes up our manic squirrel's day. Each day is about finding that golden nut and magical hiding space to enjoy during that long winter. The squirrel in me likes to gather art supplies, pens, paper, sparkly glitter and more as I prepare for a long Minnesota winter.

This drawing is of one of my busy squirrels.  As I began drawing and painting her, it kept getting more and more complex- which fits these rascals very well. 


The Bragg Liquid Aminos is one of my favorite finds to replace soy sauce.  It is gluten free and delicious!  This is new to so many of my family, friends, and clients that I wanted to introduce it to people who haven’t tried it yet.  It is full of good things for your body and great in many dishes.
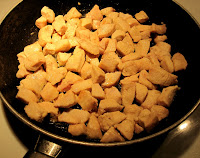
After watching our goofy squirrel's loving their delicious treats, I thought they would be great inspiration for another favorite recipe of mine- Cashew Chicken.  If the squirrel's had their way, they would have a nice stash of cashews, but they can't figure out that bird feeder.  Instead, you can enjoy this recipe for these busy little guys and stash this away into your recipe collection.  This is gluten free, dairy & fructose intolerance friendly, and delicious.


ColleĆ”yn’s Cashew Chicken
Ingredients
2 Chicken breasts, cubed
1-2 Tbsp. Olive Oil
1 cup basmati rice cooked in 2 cups water
Roasted salted cashews

Sauce
Dry Ingredients
1 ½ Tbsp. dextrose
2 ½ tsp. cornstarch
1 tsp. salt
¼ tsp. garlic salt

Wet Ingredients
½ cup + 1 Tbsp. water
2 Tbsp. Bragg Liquid Aminos
1 tsp. toasted sesame oil
½ tsp. regular sesame oil

Directions

*     Cut chicken breasts into cubes with a kitchen scissors  
*     Start cooking basmati rice according to package instructions. 
*     While rice is cooking, fry the cubes of chicken in the olive oil. 
*     I like to put the dry ingredients in one bowl and the wet ingredients in a large bowl, then combine together.
*     When chicken is done, pour the sauce over the chicken and simmer on low until it thickens to a nice sauce.  Stir constantly.  This only takes a few minutes. 
*     Serve the chicken and sauce on top of the rice 
*     Sprinkle with cashews and enjoy!
*     Feel free to modify the salt and Bragg Liquid Aminos to your taste.  I am on a high salt diet, so feel free to cut this back if needed.  The Bragg Liquid Aminos is salt free and gives a great burst of flavor.

Excellent!
Have this often!


Tuesday, September 4, 2012

Angel of Goodness & Love

(c) 2012 Colleayn T. Klaibourne

I love Angels!  My goal this year was to get back into drawing & painting.  I think my Angels were very helpful in creating the space, time and motivation to create Art again.  With some life changes and some tweeking of my work, daily schedule, and studio arrangement, I found a way to do so.  Little did I know that I would be led to start drawing them.  I see Angels all around people when I do my healing work. I wish I could take a photo of them so my clients could see them as well.  I am learning how to draw faces so I can draw what I see in my intuitive minds eye.  My Angels are listening but instead of having a photograph magically appear, they are steering me to learn how to paint them myself. I am still in the learning process of this exciting adventure.  I can't wait to see what appears next.  

This is an Angel of Goodness and Love.  She is created with Acrylic Paints, Colored pencils, Markers and Pens.  We all have Angels around us, and she is here to remind us that we are surrounded by LOVE and at any time something GOOD can happen.  

Wednesday, August 15, 2012

When Artists Cook- French Fries


Hi Everyone.  I am happy to share that I am part of a blog series called "When Artists Cook".  Each week an artist will share their art which is focused around food, recipes, cooking, and more. This month I am sharing one of my favorite recipes of oven baked french fries.  I could eat these every day!  

Joy
(c) Colleayn T. Klaibourne 2012
Mandala of oregano & basil growing in my garden.  
Twinkling H2O watercolors on watercolor paper


This is a peak of some of the paintings, information and recipe I've added.  You'll find the full post at: http://diondior.blogspot.com/2012/08/when-artists-cook_15.html.  To see other great works of art by Dion Dior and other artists in the series please visit: http://diondior.blogspot.com/  Dion's work is so vibrant, colorful and happy. I'm sure you'll love her blog as well.


Oven French Fries:

Ingredients:
4 large russet potatoes (peeled if you have fructose intolerance)
3 Tbsp. Olive Oil
½ - ¾ tsp. Celtic sea salt
¼ tsp. garlic salt
1/8 tsp. ground cumin
¾ tsp. basil leaves
1 tsp. Italian seasoning
¼ tsp. chili powder

Instructions:
Peel and cut potatoes into strips.  In a large mixing bowl, drizzle potatoes with olive oil and add salt and herbs.  Stir until the potatoes are evenly coated.  Place potatoes on a non-stick cookie sheet that has the lips on each side.  I like to spray the pan first with an olive oil spray.
Bake at 420° for 45-55 minutes, flipping every 15 minutes.  Some days the fries cook faster than other days.
Feel free to modify the salt and herbs to your taste.  I am on a high salt diet, so feel free to cut this back if needed.

I love using herbs from my garden.  The recipe below is with dried herbs, but if you have fresh cut herbs it makes the French fries even better.  

I love dipping them in Mayo seasoned with Salt, Garlic Salt, Italian Seasonings, Basil and Oregano.

Eat often!


Sunday, August 5, 2012

Something new is ready to emerge!


I'm on a journey to learn how to draw faces and bodies so I can create Angels and Faeries. 
3 Weeks ago, I didn't even know where to begin to draw a face. Thanks to Jane Davenports Supply Me class, I am on my way.  It is fun to see faces appear with their own personality.  I've always enjoyed drawing and painting, but have steered clear of people.  I'm leaving my comfort zone of Flowers, Celtic Art and Mandalas so I can create more of the magical world all around us. This will add a missing piece to the Art I have in my mind to create. 


Week by week, I learn new ways to add that twinkle to the eye.  


Happy Faces emerge.


I had to take a deep breath as I started painting her with ink and no pencil sketch underneath.  
Step out of your comfort zone.  Magical things are waiting to emerge for you too.

Saturday, July 7, 2012

Happy July Day!


(c) 2012, Colleayn T. Klaibourne

I love the color red.  This started with a yellow and green background, but as the details came together, it wanted to become a beautiful red and burgundy color. It may be a reflection of the last couple of weeks being in the upper 90's - 100 degree temps. with high humidity.  It portrays July perfectly with the beautiful flowers, warmth, festivities, and more.  Happy July everyone!

Thursday, June 28, 2012

Mandala to Energize the Mind


(c) 2012  Colleayn T. Klaibourne

This Mandala was created by painting Silks Acrylics and gel pens on Black Gessoed paper.  This one has a lot of shine and is energizing to the mind.  

Monday, June 25, 2012

Mandala for Summer Joy!

(c) 2012 Colleayn T. Klaibourne

This is a Mandala created with Twinkling H2O watercolors on watercolor paper.


I am taking an Online class called Wisdom Circles with Dion Dior.  She is great inspiration. 
I love to see what wants to emerge through meditation and the dance of color on paper.  I let the design and colors lead me, so each piece is a surprise ready to unfold.  I am always amazed how powerful Mandalas are. 

Sunday, June 24, 2012

Mandala Magic

 (C) 2012, Colleayn T. Klaibourne

 (C) 2012, Colleayn T. Klaibourne

  (C) 2012, Colleayn T. Klaibourne

Here is it completed with designs added to the Mandala.


 (C) 2012, Colleayn T. Klaibourne

One stencil creating 2 completely different looks.  
I really enjoy using heavy gel medium in my art.  I have been making some stencils to use with gel medium to get more dimension in my art. Each was created using acrylic paint, Silks, and stencils. 

 (C) 2012, Colleayn T. Klaibourne

This Mandala was created using Twinkling H2O paint and a gold gel pen.  I love how the mica shines so bright on the black paper.  

Friday, June 1, 2012

The Dance of a Mandala

(c) 2012 Colleayn T. Klaibourne

This Mandala was created using Micron pens, Luminarte Silks and Twinkling H2O's on 140 Ib watercolor paper.  I wish the photograph could capture how much it glistens.
Mandalas are so magical.  As you gaze at them, they come to life.  The design dances, the colors move, and new colors emerge and bounce off the page.
Enjoy and see what this Mandala has to offer you!

Saturday, April 28, 2012

Twinkling H2O Mandala

(c) 2012 Colleayn T. Klaibourne

This Mandala was created using Twinkling H2O watercolors and a Micron Pen.  I wish this photo could show the beautiful shimmer these watercolors create.  They are so fun!  (It looks a bit distorted due to the watercolor paper bending slightly at the top, but it really dances as you meditate with it.)   

Monday, April 9, 2012

New Mandalas

(c) 2012  Colleayn T. Klaibourne
Watercolors, Sakura & Uni-Ball Pens, Watercolor and rice paper. 

Hi,  I've been having fun creating new Mandalas this week.  I have found as I have been meditating on them, they have created nice change, growth, insights and opportunities.  The mandalas in the above photo are being enjoyed by some "Fun Buns" created by my Mom.  

The intention for this Mandala is for Financial Healing.  After 2 evenings of meditating on this mandala, I received great insights and unexpected, increased income. 


This was created Easter Sunday, 2012.

A mandala is a symbolic picture or pattern used in meditation. Mandalas come directly from the unconscious mind to heal body, mind and spirit.  The design, colors and its geometry are specifically designed to bring about inner focus and inner peace.  Mandalas most often are in the form of a circle- a shape that represents the self, the Earth, the Sun, and the state of wholeness we strive for. 

The modern usage of the mandala comes largely from Psychiatrist Carl Jung.  He started with his own experience with drawing circles, shapes and designs, and noticed they somehow corresponded to his inner situation, feelings, impressions, and thoughts.  He concluded after some study of the matter with his own drawings and also the drawings of his patients, that these circular drawings were therapeutic, first to draw, then to look at.  Carl Jung saw the circular images his clients experienced as "movement towards psychological growth, expressing the idea of a safe refuge, inner reconciliation and wholeness."

Simply rest your gaze at the center of the image, or slightly above the center, keeping your eyes softly focused.  Do this for 10 -20 minutes per day to experience the benefits of these healing art pieces.   
Try not to stare at it, nor to let your mind wander to random thoughts about the image.  Simply allow the image and its design to soak into your consciousness.  Healing happens at deep levels that may feel spontaneous and immediate, or it might evolve over time.  Mandala meditation allows you to encourage healing at a pace that is right for you.  By setting aside a little time every day to look at a mandala will help you relax and feel balanced.

Each time you meditate on a mandala, you will experience new insights and will help you discover more about who you are. 

Friday, March 16, 2012

Happy St. Patrick' Day Mandala


Joy & Happiness Mandala
(c) 2012 Colleayn Klaibourne
Watercolor, Micron pens, & Twinkling H20's on Watercolor paper

Happy St. Patrick's day.  Here is a joyful Mandala to celebrate this beautiful time of year and the great Spring weather we have been experiencing this week in Minnesota.  It is great to be Irish!
Enjoy!

LinkWithin

Related Posts with Thumbnails